
WampServer is a web development platform for Microsoft Windows that consists of Apache web server, PHP, MySQL, and phpMyAdmin. You can install WampServer on a Windows computer to create a local web server. With a local web server, you can create blogs, websites or other web applications based on the PHP programming language.
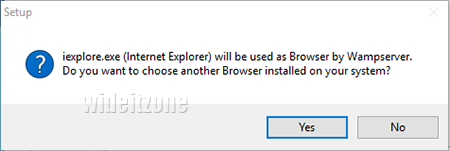
When you install WampServer in Microsoft Windows 10, there is a process which WampServer asks your approval to use Internet Explorer (iexplore.exe) as the default browser. Here, you need to decide whether you want to use Internet Explorer or another browser already installed on your computer. This default browser will be run automatically when open localhost.
Although the settings of the default browser are sufficient to perform its functionality, sometimes in certain situations, you need to do setting changes related to JavaScrip, pop-ups, cookies, images, plugins or even install additional extensions. Changing the settings or adding the extensions can cause the browser unstable and run slowly.
When the default browser of WampServer is not working properly, you need to reset or restore to its original state. Another alternative is to replace the default browser with another browser. If you want to change the default browser, you can do it via the wampmanager.conf file in the wamp64 folder (when using a 64-bit wampserver). Here is how:
Open File Explorer, navigate to the wamp64 folder (1), right-click the mouse right on the wampmanager.conf file to display the shortcut menus (2), and then select the Nopepad++ text editor (3) or another text editor you have.

The wampmanager.conf file opens in the Notepad ++ text editor. In the line number 9, you can see the path of the Internet Explorer browser (iexplore.exe) which is the default browser used by WampServer. You can change this default browser by changing the path to the browser path you want, for example Google Chrome.

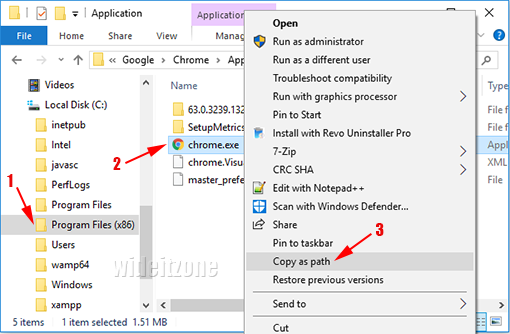
To get the path of the Google Chrome browser, run File Explorer, navigate to the Application folder of the Chrome folder (1), find the chrome.exe file (2), while pressing down the Shift key, right-click the mouse right in the chrome.exe file to display the shortcut menus and then select Copy as path (3).
In the Notepad ++ text editor, paste the path of the Google Chrome browser to replace the path of the Internet Explorer browser (1) and then save it by clicking the Save button (2).

To see the result, exit from the currently running WampServer and then rerun. Now, every time you access localhost, Google Chrome as the default browser will run.

